

Up until now, all of my blog posts have been focused on client sessions. Or, my kids (if you’ve been following along with the occasional “Mom Life Mondays” post). I decided to switch it up this week, and do a post on something that was a bit more behind the scenes! Today I’ll be focusing on some editing techniques that I have found to be game changers.
Before I started photography, I didn’t really understand what went into editing photos. So you can imagine that it was a bit of a shock when I first dove into professional photography last year, and I spent a TON of time editing to get my photos looking the way I wanted them. I was just learning my camera, and the photos required a decent amount of adjusting exposure, white balance, and a million other things. It was very time consuming!
However, I’ve spent the last year taking courses on how to get the images looking exactly how I want them to look in camera (shout out to Amy & Jordan, Katelyn James, and Kelly Brown!). This has cut my editing time down significantly. It used to take me hours and hours to edit a single session. I’d deliver the session in 2-3 weeks, and still not be 100% happy with every photo. Now, I find myself consistently editing a full session of over 100 photos in one or two nights, after the kids are asleep. Since I work full time during the day, this was life changing for me!
Despite this, I always find a few things that pop up during a session that I just have no control over. Or a photo that came out great, but something in the background that takes away from the gorgeous couple. While I always edit my photos in Lightroom, in cases like this I find myself using Photoshop, and it has taken photos to the next level. My goal for each session is to make the couple shine, and when there are things in the background or circumstances outside my control that take away from the image, Photoshop is an amazing tool to take the image from good to great. In this post, I just wanted to run through a few examples, and show some before/after shots! I know some photographers avoid showing the “before” pictures, but I personally love seeing the difference in photos after making some tweaks.
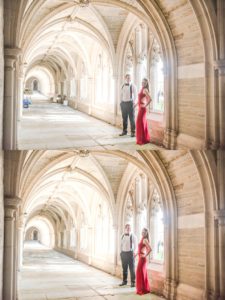
Let’s start with this image from William + Emalee’s engagement session at Princeton University. There was a particular building that they loved and wanted to feature in their photos. Unfortunately, it was the reunion and graduation weekend, and there were tables, chairs, and other items that were scattered in this hall that we couldn’t move. I knew they really wanted this shot, and so we went for it anyway. I could’ve done a closer crop (and they did have a few in their final gallery), but the beauty of this hallway is showcased more by doing a wide shot. So I took this wide shot, and then afterwards I removed the items using the clone tool in Photoshop. I love how the final image came out, and it just looks so much cleaner and more elegant than the original with the various distractions.
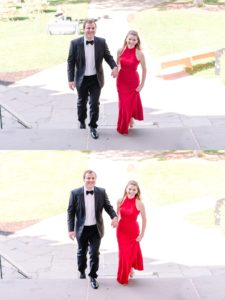
Here’s another example from their shoot, where there was set up for the reunion going on in the background. Cleaning that up makes the two of them pop!
Here’s a shot from Kristen + Tyler’s engagement session in Morristown. This was the exact location that Tyler proposed to Kristen, and it was so important to get a shot here. It was a beautiful spot! I loved how the final shot came out, but the way the trees were growing made the photo feel that it was a bit crooked. Also, without the large tree trunk, the photo has a much softer, romantic feel to it. I tried shooting at alternate angles, but there were just too many large tree trunks to get a photo without one. After cloning out the tree trunk, I love how the final image came out – and your eyes are now drawn to the two of them and this special moment, instead of the tree in the background.

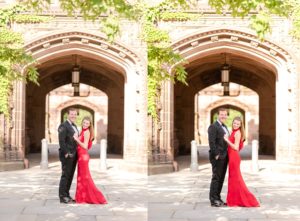
What happens when a couple wants a shot, but the lighting is speckled? Normally you can shift them around to avoid hot spots, but these two had to be placed in a specific spot in order to get them framed perfectly between the two arches. The sun peeked out and speckled them with light. They were dressed to kill – and I didn’t want specks of light to take away from that! We went ahead with the shot, and it was a quick fix later.
Now I’m going to shift gears a bit, and talk about using Photoshop for newborn sessions. Every newborn session that I do, I aim to deliver 2-3 composite images. These are images that cannot be achieved in camera. Sometimes, certain poses require the baby to have a spotter in order to be photographed safely (and the spotter gets edited out later). I plan on doing a whole separate blog post on how to achieve certain newborn images safely! But, I did want to share some examples of newborn composites that are just for fun. I sometimes use a digital backdrop in order to deliver some fun, unique images. I use photos that I took of the baby, and overlay them to a digital backdrop in Photoshop. These images provide some extra variety in the gallery, and they tend to be favorites! Here are some examples of the in camera shot, next to the Photoshopped image.


Hope it was fun for you to get some insight into what goes on after a session! It’s always great to see a photo that looks amazing without any editing needed, but when there is a way to improve a photo by making some small tweaks, I love seeing the before and after! Stay tuned for more behind the scenes posts in the future!

Wow, Nikki that was a fantastic post. I love reading your blog and seeing your talent progress! Your work is just gorgeous and I have to say top notch. I’m recommmeding you as fast as I can. Xoxo
Thank you! I appreciate it!